Back to Energy Manager Main Menu
Adding user types
When adding a user in Energy Manager, you must select the level of access that user will have by assigning them a User Type. There are 3 default User Types in the system, but you can also create and define additional User Types. User Types are defined by their selected Menu Permissions, which can range from “No Access” to “Add, Edit, Delete”.
User types
-
Administrator – (This role cannot be edited or deleted.) This is a see all/do all role. Administrators have access to everything under Organization Setup, Facility Details, Utility Accounts, Billing Data, and all Reports and Charts.
-
General User – Menu Permissions for this User Type can vary depending on the access these users need. If set to a Menu Permission of 5 (Add, Edit, Delete) for everything, this role is very similar to the Administrator role, with the exception of being able to edit General Info settings under Organization Setup.
-
Read Only – Generally this role should be set to a 1 (Read Only) for everything, but the permissions can be adjusted to allow ReadOnly users to have more functionality.
Menu permissions
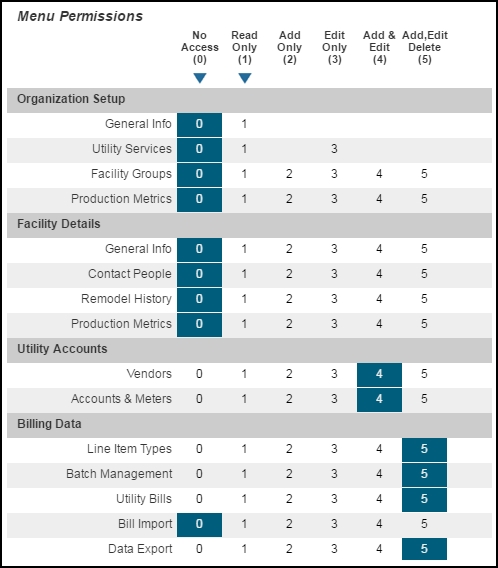
Menu permissions can be set for each user type allowing for different levels of access to each section of Energy Manager.
- No Access (0) – User is unable to view or edit that section
- Read Only (1) – User can view this section, but not edit
- Add Only (2) – User can view and add new items to these sections (Facility Groups, Facility Details, Utility Accounts, Billing Data, etc…)
- Edit Only (3) – User can view and edit existing items in these sections (Facility Groups, Facility Details, Utility Accounts, Billing Data, etc…)
- Add & Edit (4) – User can view, edit, and add new items to these sections (Facility Groups, Facility Details, Utility Accounts, Billing Data, etc…)
- Add, Edit, Delete (5) - User can view, edit, delete, and add new items to these sections (Facility Groups, Facility Details, Utility Accounts, Billing Data, etc…)
Adding user types
-
Click on the System Admin tab.
- Click on User Types.
-
Click the Add User Type button.
-
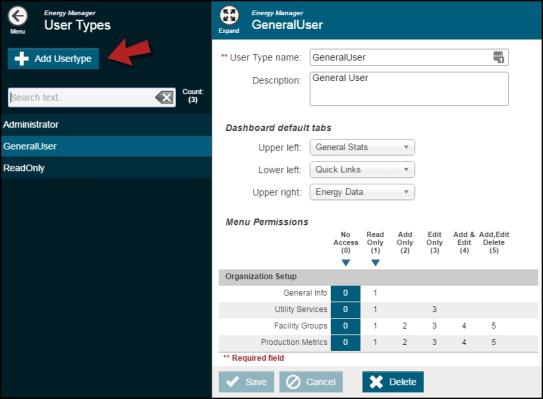
Enter the User Type name and Description (if applicable).
-
Adjust the Dashboard default tabs if needed. This affects what the user assigned to this User Type sees on their home page.
-
Set the Menu Permissions.
-
Click Save.